How To Add Products To Shopify: Step-by-Step Guide
A perfectly crafted Shopify product page is like a vehicle that moves your customer from point A (product discovery) to point B (final purchase) smoothly.
Here, your job is to build that pathway.
In this blog, learn how to add products to Shopify as easily as possible and know the best practices to make customers buy your products.
What are Products in Shopify?
Before we get to the steps, let us get some basics right.
Products are the items or goods that you can sell in your online store. It can be a physical good, digital downloads, services, and more.
For example, if you are a fitness expert planning to sell ebooks online, then your product here is an ebook that your customers can easily download and get access to.
And as feature-filled Shopify is, you get various functionalities to display your product effectively and showcase every aspect.
Now, let us see the steps of adding products to Shopify.
How to Create a Product in Shopify?
- Step 1: Log in to Your Shopify Account
- Step 2: Fill in The Product Details
- Step 3: Add Pricing, Inventory, And Shipping Information
- Step 4: Edit Search Engine Listing
- Step 5: Add Product Organization And Product Status
Step 1: Log in to Your Shopify Account
Log into your Shopify admin, head to Products and click Add product from the left-hand side panel.

Step 2: Fill in The Product Details
You will spend most of your time under this section, as whatever you fill out here will be reflected to your customers.
The more detailed this information, the better.
Let us move ahead step-by-step and look at each piece of information. To make this process more understandable, we are taking the example of white headphones as our product.
The first set of information you need to fill in is your product title, description, and media.
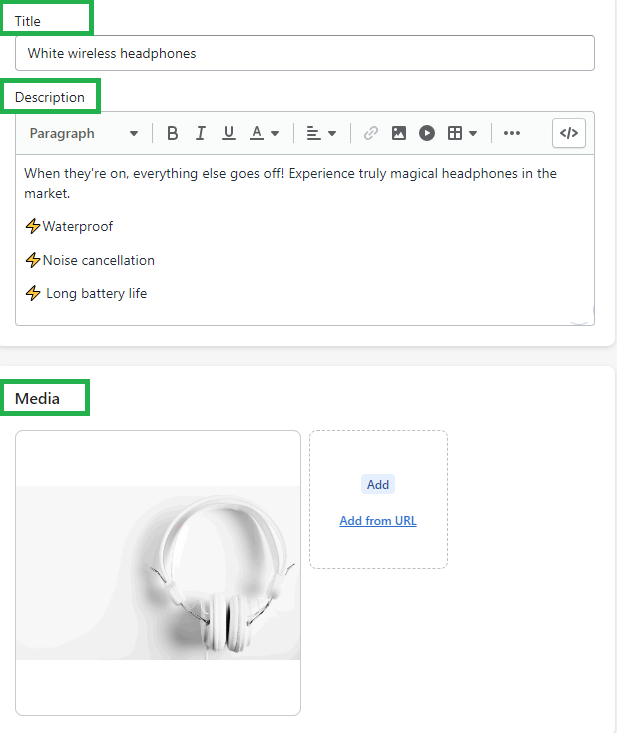
- Product Title: Write a short and sweet title describing your product. Keep it crisp.
- Product Description: Be descriptive here and cover the significant aspects of your product in a cheerful tone, including action-driven words/sentences.
- Media: Add images of your products. You can include different formats like short videos, descriptive videos, or a 3D model.
💡Useful Tips:
- While writing your product description and title, make use of keywords. Don’t overdo it with keywords, but try to maintain a good balance.
- Use high-quality and SEO-optimized images to give a perfect visual representation of your products.
Step 3: Adding Pricing, Inventory, And Shipping Information
Now, as you scroll down, you will fill in the following information: Pricing, Inventory, Shipping, and Variants.
Pricing
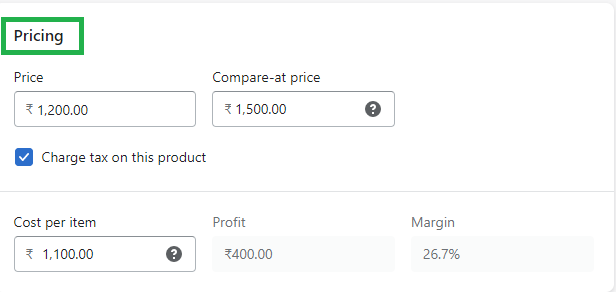
- Price: In the price box, mention the price your customer will have to pay during checkout.
- Compare-at price: This is the original price of the product, which is displayed with a strike over it. You can use this feature, especially during discounts/offers.
- Cost per item: This section is not visible to your shoppers. It is for your analysis and calculation to track your profit.
- Tax details: If your product is taxable, check the box charge tax on this product.
Inventory
After pricing, you will need to fill in the inventory details.

- Address & Quantity: Add and select your physical address if you manage the inventory yourself with the quantity.
- SKU/Barcode: Filling SKU and barcode to manage your inventory efficiently.
- Select inventory options: Here, you must also select an option to track your inventory or continue selling when the product is out of stock.
💡 Useful Tip:
- It is a good option to track your inventory to meet the product demand consistently, but if you are confident with your re-stocking, you can opt for the second option.
Shipping
Now, let’s add the shipping details.

- Physical product: Check the circle if you are selling a physical product and enter the product’s weight. There are different measurement settings available to add the correct weight of the product.
- Customs information: This is useful if you are planning to ship internationally. Simply enter the country/region of origin and the HS code (Harmonized system).
- Variants: Here, you can show the different color and size variations available for your product. Click on + add options like size or color, and fill in the product information.
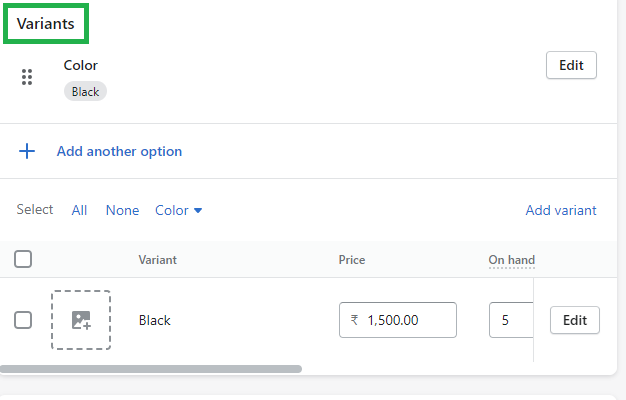
You can click on add another option if you have multiple product alternatives.
Step 4: Edit Search Engine Listing
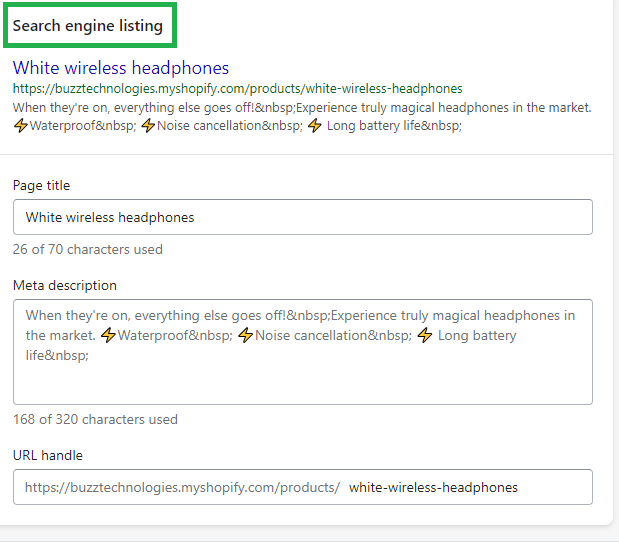
Here, you get a preview of how your product page will appear on search engines like Google, Bing, and more.
By default, Shopify will pick the product title and product description here. You can click on edit and make changes accordingly.
Step 5: Product Organization and Product Status
Now, scroll up and move to the right-hand side of the dashboard.
Here, you will see three information cards: Product organization, Sales channels and apps, and product status.
- Product organization: Here, you need to fill in these five fields:
→ Product category: Mention the category of the product.
→ Product type: You can customize or insert from the available product type option.
→ Vendor: This section is generally for manufacturers, vendors, and others. You can also leave this option blank.
→ Collections: You can easily segment and add your product to a particular collection. This makes it easier for the shoppers to navigate different options.
→ Tags: You can add multiple tags depending on your product. These tags also help in your Shopify store’s SEO. - Sales channels and apps: You can select the channels where you want to sell your product. The channels you choose for your product will be available there.
- Product status: If everything feels click Active or choose the draft option.
Now, from the top bar, click the save button to finish adding products to Shopify. And this way you have successfully done with your Shopify add product task.
Recommended read: How to create a sticky add to cart button in Shopify
We are sure it would be much easier for you to create a product page yourself. But here, you can speed up this process by simply duplicating the existing page.
Create a Duplicate Page
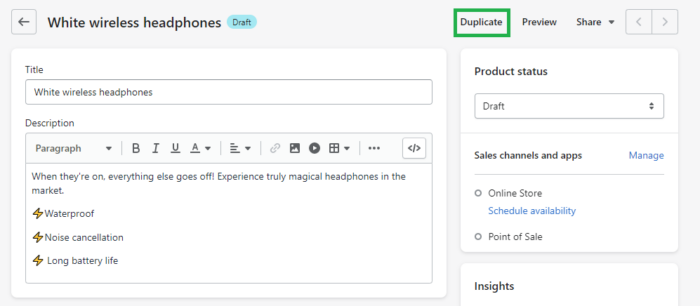
Once you have followed these five steps, you don’t need to repeat them when creating a new product page. You can easily create a duplicate page.
Here are the steps to create a duplicate page.
- Head to Products > All Products from your Shopify dashboard
- Click on the product you want to duplicate and check on the Duplicate box.
- Enter a name for the duplicate page
- Click Duplicate again
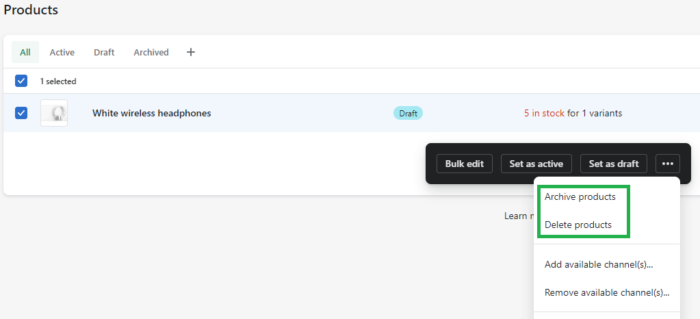
If, in the future, you wish to archive or delete any product page, here is the process to follow.
Archive Page
- Head to Products in the dashboard.
- Select the product you want to archive.
- Click the Archive product from the dashboard.
Delete Page
- Head to Products in the dashboard.
- Select the product you want to delete.
- Click delete the product and confirm.
Frequently Asked Questions
1. How to add multiple products to Shopify?
Ans: You have two options here: you can either upload a CSV file or install a third-party app.
2. How many products can you add on Shopify?
Ans: There is no product limit set by Shopify. You can add unlimited products.
3. Can you add custom products to Shopify?
Ans: Yes, you can create and add customized products to Shopify.
Conclusion
And that is how you can add products to Shopify.
We encourage you to go ahead and add products to your store. If you feel stuck, you can use this guide to move forward.
If you have any questions or doubts, feel free to ask us in the comment section. Our Shopify experts would love to guide you.
Thanks for reading, and happy creating to you!
Unlock expert strategies to supercharge your Shopify store. Click here to expand your reach.
Related Posts:
Krupali Gohil
Krupali is a content writer at Meetanshi. She is an experienced writer who gives words life and loves writing content that makes a difference.


Prev
10 Display Advertising Statistics Every Marketer Should Know in 2024
15+ Best ChatGPT Alternatives for 2024
Next