Magento 2 API – Set Shipping & Billing Information

End-to-end Magento integration
Integrate any app or service. Consult our API development experts.
Hello, Magento peeps!
I am back with another tutorial on Magento 2 API – Set Shipping & Billing Information.
My last blog post of the Magento 2 API series was all about creating a cart and adding products to it. In case you missed reading it, check it out at Magento 2 API – Create Cart & Add Products to Cart. This blog post is all about preparing the cart for checkout by entering the shipping & billing details.
Let’s go!
Magento 2 API to Prepare for Checkout
Your customer has already added their desired products to the cart and willing to place the order. Now what? You need to get the billing and shipping information from the customers and display the appropriate shipping methods along with costs to them. You can use this complete guide on preparing the customer for checkout by setting the shipping and billing information through Magento 2 API.
Step 1: Estimate Shipping Costs Using Magento 2 Rest API
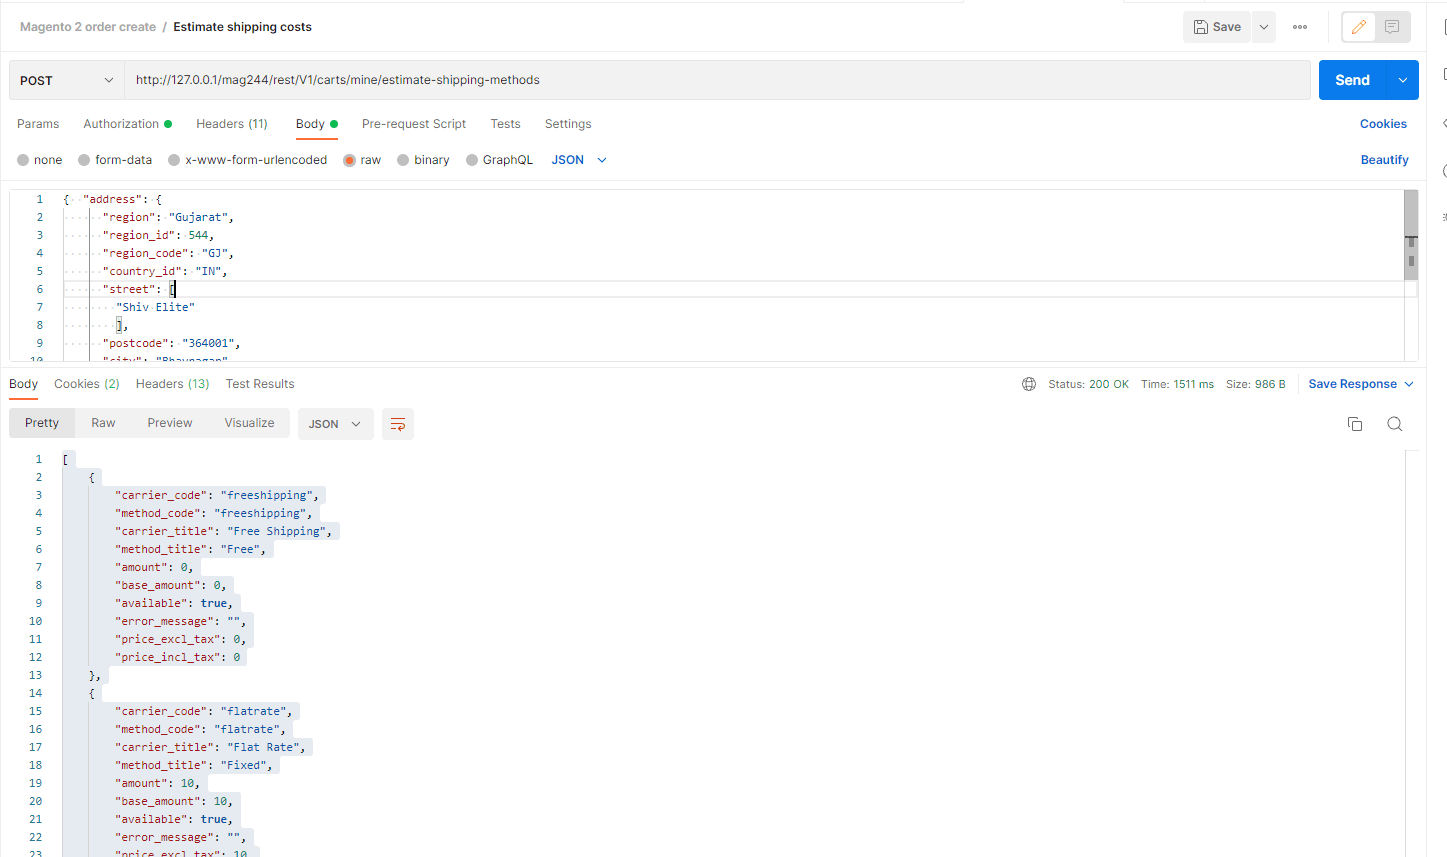
In order to display the available shipping methods and estimate the shipping costs, Magento 2 needs the billing and shipping information from the client. You can use the store_url/rest/V1/carts/mine/estimate-shipping-methods endpoint to send the information through a POST request along with the customer access token and fetch the required details. You can refer to the example provided below for a better understanding of Magento 2 API for setting shipping & billing information:
Method: POST
URL: store_url/rest/V1/carts/mine/estimate-shipping-methods
Headers:
- Bearer Token: <Customer_token>
Body:
|
1 2 3 4 5 6 7 8 9 10 11 12 13 14 15 16 17 18 |
{ "address": { "region": "Gujarat", "region_id": 544, "region_code": "GJ", "country_id": "IN", "street": [ "Shiv Elite" ], "postcode": "364001", "city": "Bhavnagar", "firstname": "Sanjay", "lastname": "Jethva", "customer_id": 1, "telephone": "8141102201", "same_as_billing": 1 } } |

Response:
The Magento 2 authorizes the request through the customer access token and replies with the available shipping methods and estimated costs according to the information submitted in the request. An example of the response is provided below:
|
1 2 3 4 5 6 7 8 9 10 11 12 13 14 15 16 17 18 19 20 21 22 23 24 25 26 27 |
[ { "carrier_code": "freeshipping", "method_code": "freeshipping", "carrier_title": "Free Shipping", "method_title": "Free", "amount": 0, "base_amount": 0, "available": true, "error_message": "", "price_excl_tax": 0, "price_incl_tax": 0 }, { "carrier_code": "flatrate", "method_code": "flatrate", "carrier_title": "Flat Rate", "method_title": "Fixed", "amount": 10, "base_amount": 10, "available": true, "error_message": "", "price_excl_tax": 10, "price_incl_tax": 10 } ] |
Now, you can use the response of the API request to display all the available shipping methods along with costs to the customers on the frontend.
Step 2: Set Shipping & Billing Information Using Magento 2 REST API
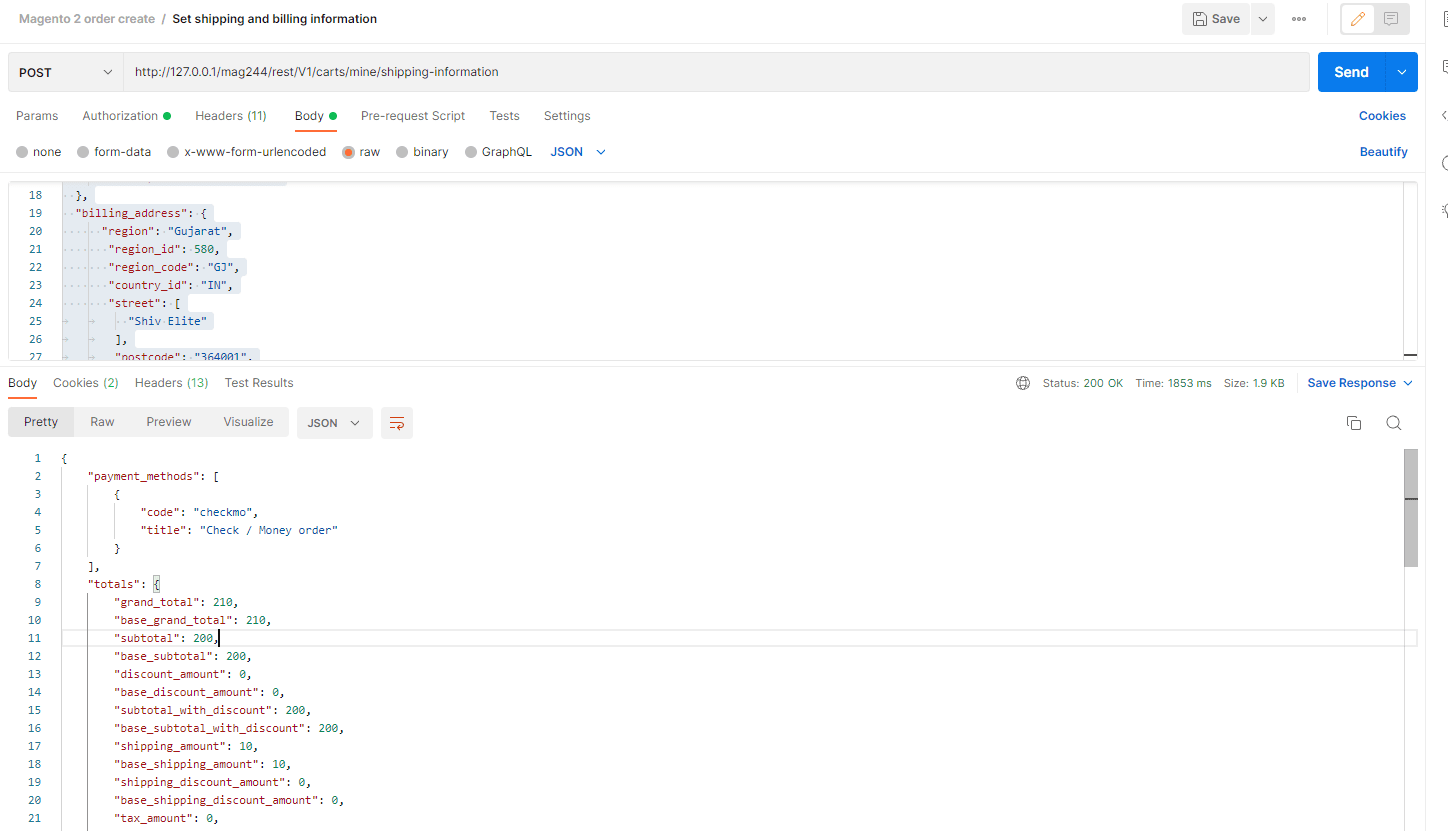
In the next step, the customer selects his/her preferred shipping method, enters the shipping & billing information, and proceeds to checkout. You can use the store_url/V1/carts/mine/shipping-information and send the information through a POST request to fetch the payment information. Not to mention that this API requires customer access, and therefore, the client needs to pass the access token for authorization. You can refer to the example provided below for more details:
Method: POST
URL: store_url/V1/carts/mine/shipping-information
Headers:
- Bearer Token: <Customer_token>
Body:
|
1 2 3 4 5 6 7 8 9 10 11 12 13 14 15 16 17 18 19 20 21 22 23 24 25 26 27 28 29 30 31 32 33 34 35 |
{ "addressInformation": { "shipping_address": { "region": "Gujarat", "region_id": 580, "region_code": "GJ", "country_id": "IN", "street": [ "Shiv Elite" ], "postcode": "364001", "city": "Bhavnagar", "firstname": "Jignesh", "lastname": "Parmar", "telephone": "8141102201" }, "billing_address": { "region": "Gujarat", "region_id": 580, "region_code": "GJ", "country_id": "IN", "street": [ "Shiv Elite" ], "postcode": "364001", "city": "Bhavnagar", "firstname": "Jignesh", "lastname": "Parmar", "telephone": "8141102201" }, "shipping_carrier_code": "flatrate", "shipping_method_code": "flatrate" } } |

Response:
On successful authorization of the request, Magento 2 will respond back with all the available payment options that you can display to the customers on the frontend.
|
1 2 3 4 5 6 7 8 9 10 11 12 13 14 15 16 17 18 19 20 21 22 23 24 25 26 |
[ { "carrier_code": "freeshipping", "method_code": "freeshipping", "carrier_title": "Free Shipping", "method_title": "Free", "amount": 0, "base_amount": 0, "available": true, "error_message": "", "price_excl_tax": 0, "price_incl_tax": 0 }, { "carrier_code": "flatrate", "method_code": "flatrate", "carrier_title": "Flat Rate", "method_title": "Fixed", "amount": 5, "base_amount": 5, "available": true, "error_message": "", "price_excl_tax": 5, "price_incl_tax": 5 } ] |
Conclusion
Shipping and billing information are vital for estimating the shipping costs and displaying the available payment methods in Magento 2. I hope this Magento 2 API tutorial will help you prepare the customers for checkout using API. In case you still have any doubts or queries regarding the provided solution, feel free to comment. I will be happy to help.😊
Also, do not forget to share this useful Magento 2 API tutorial with your developer friends via social media.😃
Thanks for reading!🍀
◄ Magento 2 API – Create Cart & Add Products to CartMagento 2 API – Create Order ►
Jignesh Parmar
An expert in his field, Jignesh is the team leader at Meetanshi and a certified Magento developer. His passion for Magento has inspired others in the team too. Apart from work, he is a cricket lover.


Prev
Magento 2.3 End of Life [Everything You Need to Know]
Magento 2 API – Create an Invoice
Next