How to Back Up Magento 2 Using Command Line, Admin Panel, and Manually
Data is power!
Do you remember when did you last replicate Magento 2 and stored safely? Most of Magento 2 store owners don’t care about backups until it’s too late. When the Magento 2 store is running smoothly, no one bothers to think about the unplanned event that can damage your store spontaneously. The perfect time to backup your Magento 2 store is now which can save tons of time and bucks at the hour of need.
Irrespective of the business size and type, taking regular backups of the data is a must. Though Magento 2 is a secure platform, there is always a threat of hack. Moreover, by mistake, a critical file or folder can be deleted. At such times, Magento 2 backup serves as a blessing!
Being on the safer side is always advisable and so I have come up with methods to backup Magento 2.
There are three methods to backup Magento 2:
I’ll discuss each of the methods here.
-
Backup Magento 2 via Command Line
Switch to the Magento file system owner and use the backup command. Using below command switches a store into maintenance mode; database, media, system file backups; switches off the maintenance mode.
1magento setup:backup [--code] [--media] [--db]Command Options Meaning –code Backing up whole Magento system excluding var and pub/static folders –media Backing up pub/media folder –db Backing up Magento 2 database -
Backup Magento 2 via Admin Panel
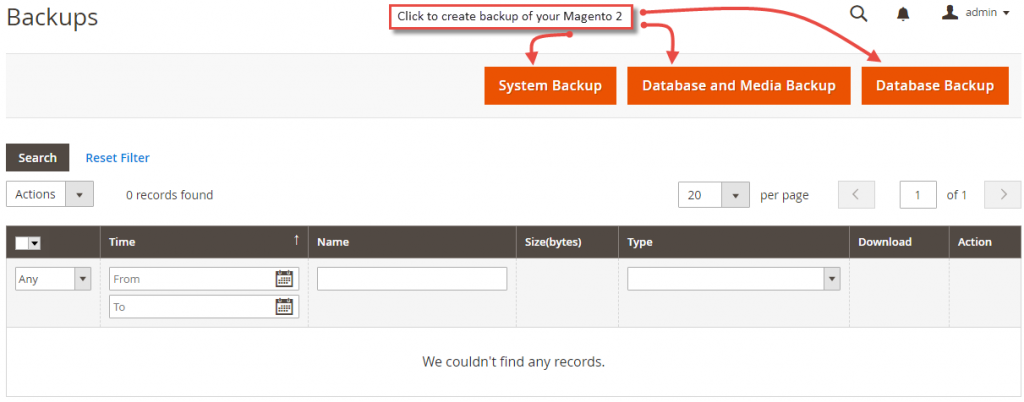
Login to Admin panel and navigate to System > Tools > Backups.
Follow the below steps:- Select the backup type from the following:

- System Backup: Creates and saves a complete copy of the database and the file system. You may include to backup the media folder as per your choice.
- Database and Media Backup: Creates a full copy of the current database and the media folder
- Database Backup: Only forms and stores a copy of the database.

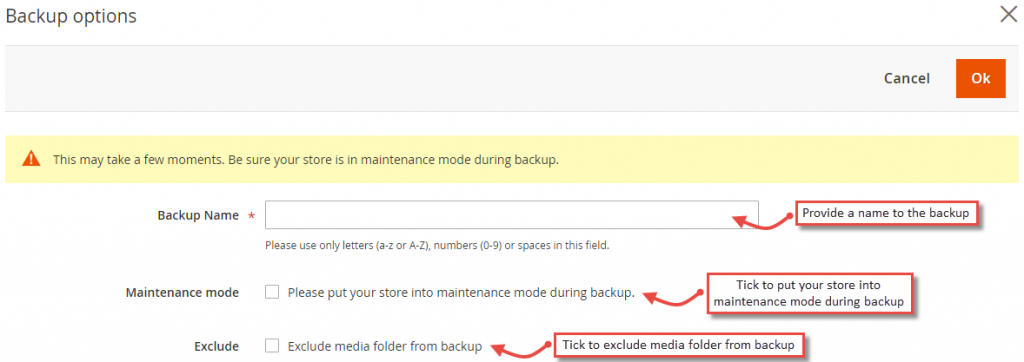
- Backup Name: Provide your backup with a name. Use only a-z/A-Z letters, 0-9 numbers, and spaces when creating a backup name.
- Maintenance Mode: You may enable the maintenance mode in your store during the backup which will result in reduced page speed but the site will be inaccessible at the time of the process until the maintenance mode is turned off again.
- Exclude: You can exclude media folder from taking backup.
- Check if the backup process went on smoothly without any errors which is indicated by a message saying “The backup is complete.” If not, you’ll have to solve the errors with the help of this guide.
- Select the backup type from the following:
-
Magento 2 Manual Backup
Follow the below steps:
- Backup files
Access your hosting account’s file structure and navigate to the /public_html directory of your account;
When your site is stored in a subfolder, you’ll have to find a necessary folder within the /public_html directory, download the directory to your computer or copy and save it to another hosting folder. - Create a MySQL database backup used on your Magento 2 website
- Navigate to cPanel and select the phpMyAdmin service.
- Select the database name used for your website.
- Store the database on the local computer as an SQL file by clicking on the “Export” button.
- With “quick” exporting method and SQL as the file format, click “Go“
- Backup files
Rolling Back to a Magento 2 Backup via the Command Line
Follow the below steps:
- Switch to the Magento file system owner.
- Enter magento info:backups:list into the command line to know the name of the latest backup you require.
- Roll back to a previous backup with this command:
1magento setup:rollback [-c|--code-file="<name>"] [-m|--media-file="<name>"] [-d|--db-file="<name>"]
You’ll get a success message. If not, please visit here.
You have gone through all the methods, so you may start back up now! Every Magento store owner must have a system to back up the database regularly to avoid exploits, bugs, hacks, crashes, and any such data loss mistakes.
Please mention your doubts in the comment section below, I’d be happy to help.
Rate the post with 5 stars ?
Sanjay Jethva
Sanjay is the co-founder and CTO of Meetanshi with hands-on expertise with Magento since 2011. He specializes in complex development, integrations, extensions, and customizations. Sanjay is one the top 50 contributor to the Magento community and is recognized by Adobe.
His passion for Magento 2 and Shopify solutions has made him a trusted source for businesses seeking to optimize their online stores. He loves sharing technical solutions related to Magento 2 & Shopify.


Prev
How to Send Magento 2 Order Confirmation Email After Payment Success
Solved: Magento 2 Add to Cart Button Not Working
Next