How to Create Custom Image Attribute for a Customer in Magento 2
A picture can express a thousand words!
Do you want the Magento 2 store customer to upload a profile picture? Or you require them to upload a picture of important documents like license, signature, etc.
The default Magento 2 does not support for the same.
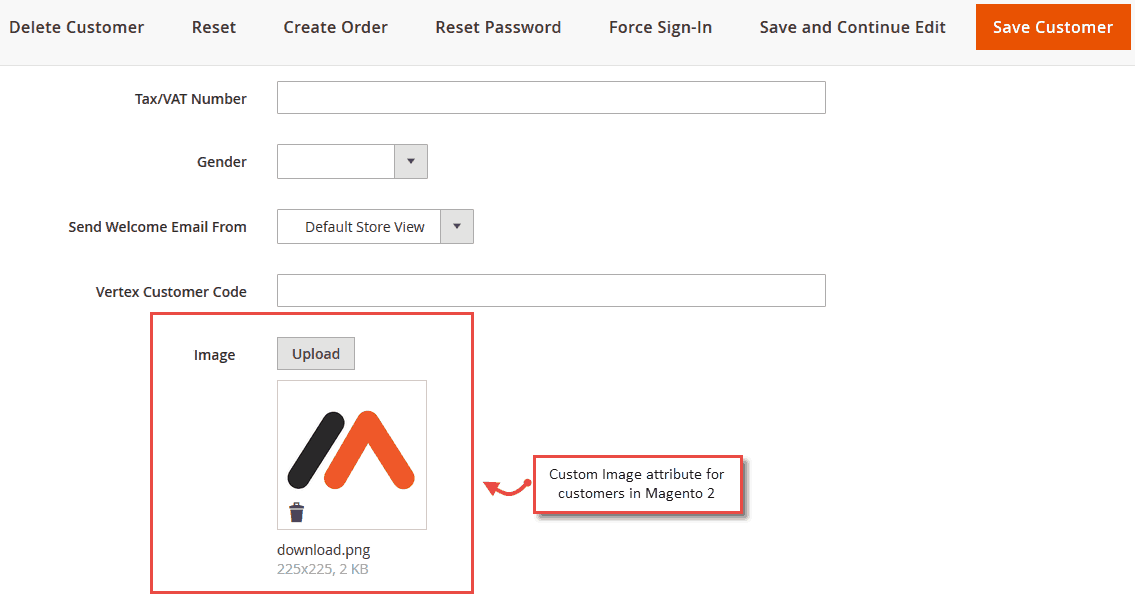
Hence, the post gives the programmatic method to create custom image attribute for a customer in Magento 2 as shown in the figure:
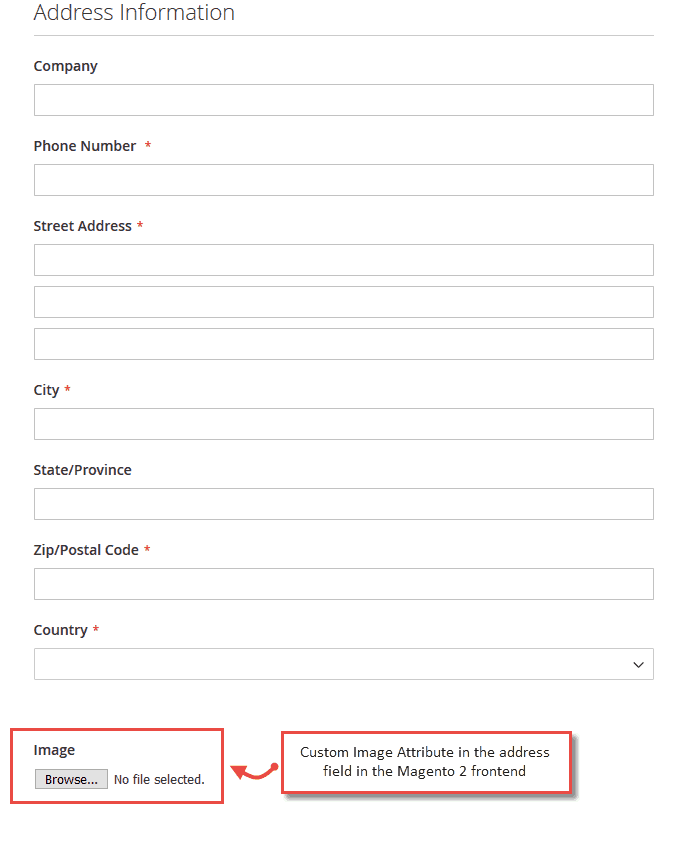
The frontend customer can use it as shown here:
Steps to create custom image attribute for a customer in Magento 2:
- Create InstallData.php file at app/code/[Vendor]/[module]/Setup/InstallData.php
12345678910111213141516171819202122232425262728293031323334353637383940414243444546474849505152535455565758596061626364656667<?phpnamespace [Vendor]\[module]\Setup;use Magento\Eav\Setup\EavSetupFactory;use Magento\Customer\Setup\CustomerSetupFactory;use Magento\Framework\Setup\InstallDataInterface;use Magento\Framework\Setup\ModuleContextInterface;use Magento\Framework\Setup\ModuleDataSetupInterface;class InstallData implements InstallDataInterface{private $eavSetupFactory;private $customerSetupFactory;public function __construct(EavSetupFactory $eavSetupFactory,CustomerSetupFactory $customerSetupFactory){$this->eavSetupFactory = $eavSetupFactory;$this->customerSetupFactory = $customerSetupFactory;}public function install(ModuleDataSetupInterface $setup,ModuleContextInterface $context) {$setup->startSetup();$eavSetup = $this->eavSetupFactory->create(['setup' => $setup]);$customerSetup = $this->customerSetupFactory->create(['setup' => $setup]);$attributeCode = 'customer_image';$customerSetup->addAttribute(\Magento\Customer\Model\Customer::ENTITY,$attributeCode,['type' => 'text','label' => 'Customer File/Image','input' => 'file','source' => '','required' => false,'visible' => true,'position' => 200,'system' => false,'backend' => '']);// used this attribute in the following forms$attribute = $customerSetup->getEavConfig()->getAttribute(\Magento\Customer\Model\Customer::ENTITY, $attributeCode)->addData(['used_in_forms' => ['adminhtml_customer','adminhtml_checkout','customer_account_create','customer_account_edit']]);$attribute->save();$setup->endSetup();}} - Add Image Upload Field in Customer Registration Page,
Create customer_account_create.xml file at app/code/[Vendor]/[Module]/view/frontend/layout/customer_account_create.xml
12345678<?xml version="1.0"?><page xmlns:xsi="http://www.w3.org/2001/XMLSchema-instance" layout="1column" xsi:noNamespaceSchemaLocation="urn:magento:framework:View/Layout/etc/page_configuration.xsd"><body><referenceContainer name="form.additional.info"><block class="Magento\Framework\View\Element\Template" name="custom_additional_field_register" template="[Vendor]_[Module]::customer/form/imagefieldregister.phtml"/></referenceContainer></body></page> - Create imagefieldregister.phtml file at app/code/[Vendor]/[Module]/view/frontend/templates/customer/form/imagefieldregister.phtml
12345678910<fieldset class="fieldset file-upload"><div class="field customer_file_upload"><label for="customer_image" class="label"><span><?php /* @escapeNotVerified */echo __($helper->FileLabel1()) ?></span></label><div class="control"><input type="file" name="customer_image" id="customer_image" title="<?php /* @escapeNotVerified */echo __('Custom Image') ?>" class="input-text" data-validate="{required:false}"></div></div></<fieldset> - To display the image in the custom account section,
Cretae customer_account_edit.xml file at app/code/[Vendor]/[Module]/view/frontend/layout/customer_account_edit.xml
123456789<?xml version="1.0"?><page xmlns:xsi="http://www.w3.org/2001/XMLSchema-instance" xsi:noNamespaceSchemaLocation="urn:magento:framework:View/Layout/etc/page_configuration.xsd"><update handle="customer_account"/><body><referenceContainer name="form.additional.info"><block class="[Vendor]\[Module]\Block\Customer\Account" name="additional_field_account" template="[Vendor]_[Module]::customer/form/imagefieldaccount.phtml"/></referenceContainer></body></page> - Cretae imagefieldaccount.phtml file at app/code/[Vendor]/[Module]/view/frontend/templates/customer/form/imagefieldaccount.phtml
12345678910<fieldset class="fieldset create account" data-hasrequired="<?php /* @escapeNotVerified */ echo __('* Required Fields') ?>"><legend class="legend"><span><?php /* @escapeNotVerified */echo __('Image Uploaded') ?></span></legend><?php if ($url = $block->getFileUrl()): ?><div class="field"><img src="<?php echo $url ?>" alt="image" /></div><?php endif;?></fieldset> - Create Account.php file at app/code/[Vendor]/[Module]/Block/Customer/Account.php
12345678910111213141516171819202122232425262728293031323334353637383940414243444546474849505152535455565758596061<?phpnamespace [Vendor]\[Module]\Block\Customer;use Magento\Backend\Block\Template\Context;use Magento\Framework\UrlInterface;use Magento\Customer\Model\SessionFactory;use Magento\Framework\View\Element\Template;class Account extends Template{protected $urlBuilder;protected $customerSession;protected $storeManager;protected $customerModel;public function __construct(Context $context,UrlInterface $urlBuilder,SessionFactory $customerSession,\Magento\Store\Model\StoreManagerInterface $storeManager,\Magento\Customer\Model\Customer $customerModel,array $data = []){$this->urlBuilder = $urlBuilder;$this->customerSession = $customerSession->create();$this->storeManager = $storeManager;$this->customerModel = $customerModel;parent::__construct($context, $data);$collection = $this->getContracts();$this->setCollection($collection);}public function getBaseUrl(){return $this->storeManager->getStore()->getBaseUrl();}public function getMediaUrl(){return $this->getBaseUrl() . 'pub/media/';}public function getCustomerImageUrl($filePath){return $this->getMediaUrl() . 'customer' . $filePath;}public function getFileUrl(){$customerData = $this->customerModel->load($this->customerSession->getId());$url = $customerData->getData('customer_image');if (!empty($url)) {return $this->getCustomerImageUrl($url);}return false;}}
Note: Custom image is store at pub/media/customer path.
Use the above solution and let customers upload their favourite profile picture in the site!
However, if you have any doubts about the implementation, mention them in the Comments section below. I’d be happy to help.
Feel free to share the solution with fellow developers via social media.
Thanks.
Sanjay Jethva
Sanjay is the co-founder and CTO of Meetanshi with hands-on expertise with Magento since 2011. He specializes in complex development, integrations, extensions, and customizations. Sanjay is one the top 50 contributor to the Magento community and is recognized by Adobe.
His passion for Magento 2 and Shopify solutions has made him a trusted source for businesses seeking to optimize their online stores. He loves sharing technical solutions related to Magento 2 & Shopify.


32 Comments
Did you know about images colletion? Suppose the customer want to upload more than 1 image.
Hello Andrea,
We’ve applied the solution for one image upload only.
It requires custom code for for more than one image.
Thank You
could you please explain how to save the image using rest api?
Hello Mahmoud,
In order to save the image using rest API, you need to create a custom rest API as it’s not possible with the default Magento API.
Because using the default API of Magento, you can save the image name only. It doesn’t work for image upload.
Thank You.
Backend site working but frontend site not working
Hello, please check again because the above solution works for us.
Thanks
Hello Sir,
Thanks for Sharing these useful details
Image upload is showing in the frontend but this image is not showing in the backend. so please give us suggestions.
Hello Ankit,
Create customer attribute using InstallData.php file.
Also, can you please check if customer attribute ‘customer_image’ is created or not.
Thanks.
Exception #0 (Exception): Notice: Undefined variable: helper in /var/www/html/skytex/code/app/code/Codealist/CustomerAttributesProfile/view/frontend/templates/customer/form/imagefieldregister.phtml on line 4
Helper file is not there
can you please help me in this
Hello,
Please try any one of the below solutions:
1. Replace echo __($helper->FileLabel1()) with echo __(‘Customer Image’)
2. $helper = $this->helper([Vendor]\[Module]\Helper\Data);
Make sure that the FileLabel1() function is created in Helper Data file.
Thank you.
How to allow only PDF extension for this upload.
Hello Zahir,
There are two methods
1. The request when image is uploaded
2. Set error message when you submit the form and request to check the file type.
Thank you.
hello you can add image upload in dynamic row ?
Hello,
Do you need dynamic rows in the customer grid?
It is possible with custom code development.
Thanks.
Hi,
i follow these steps but pub/media/customer read is not allowed by magento default htaccess (deny all). how did you deal with restriction?
Thank you.
Hello,
Please give permission with chmod and get the access.
Thanks.
HI, I followed these steps but I got Parse error: syntax error, unexpected ‘namespace’ (T_NAMESPACE) in /var/www/html/roh/app/code/vendor/module/Setup/InstallData.php on line 3.kindly help me to solve this
Hello,
It seems as if there’s some mistake in copying the code file.
Also, replace [Vendor]/[module] with your custom module.
Thank you.
I did all changes to {Vendor} and {Module} and the error always come. Pls have a look
Hello Gaurav,
Replace [Vendor]/[Module] with your extension.
Thanks.
hi,
I have checked this 5times and checked it very thoroughly, Pls check at you side and as i went through your comment section, may of them has this issue. so kindly pls go through this
Hello Gaurav,
Can you please share the exact error you are facing in the custom module?
Thanks.
PHP Parse error: syntax error, unexpected ‘namespace’ (T_NAMESPACE) in G:\xampp
\htdocs\damaan\app\code\Gaurav\Customer\Setup\InstallData.php on line 3
I attached the code with link: https://easyupload.io/rp8szp
Please have a look at code what did i wrong. i have checked it very carefully but it always give error
Please check – https://drops.meetanshi.com/ghbGNn
The third line of InstallData.php file shows Vendor where you have to write the custom module name.
Thanks.
hello..
i have to create extension attribute for customer image so can you please suggest me.
Hello Priyanka,
Please follow the steps in the above post. Replace [Vendor]/[module] with your custom module name.
Thanks.
hello…
i have to create extension attribute so plaese can you suggest me how i can create custom attribute.
Hello Janki,
All you have to do is follow the steps in the above post and replace [Vendor]/[module] with your custom module name.
Thank you.
I’m a beginner at module creation and looking for help. When I create a registration.php and a module.xml using the vendor (MyVendor) and module (CustomerImageAttribute) names I’ve determined/”made up”, and put all the files in their proper folders as created above, I get an error during compile in Setup/InstallData.php:
PHP Parse error: syntax error, unexpected ‘namespace’ (T_NAMESPACE) in /chroot/home/myserver/app/code/MyVendor/CustomerImageAttribute/Setup/InstallData.php on line 3
In all files above, I’ve replaced the [Vendor] and [module] references with the ones I “made up” and referenced above.
Can you help me understand why? Thanks.
Hey Mike,
Please replace [Vendor]\[module] with your extension and vendor name.
In MyVendor\CustoemerImageAttirbute\, the “MyVendor” is the vendor and “CustoemerImageAttirbute” is the module.
Thank you.
Getting error
“message”: “Error occurred during \”custom_attributes\” processing. Attribute \”customer_image\” has invalid value. Invalid type for value: \”array\”. Expected Type: \”string\”.”
when update image using rest api
Please help how to update image in custom attributes of customer
Hello Gagan,
You are facing this error because the image parameter is getting array value instead of the string value.
Thank you.