How to Import and Export Inventory in Magento 2
Medium to large-sized Magento 2 stores have hundreds and thousands of products. It becomes an extremely time-consuming process if the admin starts adding products one-by-one.
Moreover, in the case of multi-source inventory, updating quantity for each source cannot be done using the mass action.
Updating only the quantity of products in Magento 2 can be done easily using the method to import and export inventory in Magento 2 as shown below.
For instance, if your store operates in major European countries like France, Germany, and Italy. Assuming that you just need to make changes in product inventory for France. You can do it by importing a source-based CSV file without affecting the product inventory of Germany and Italy.
Steps to Import and Export Inventory in Magento 2
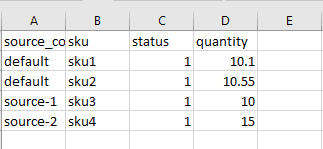
The CSV file that we use for importing and exporting inventory will have four information about the product.

- source_code – It is the code for sources.
- SKU – It is a Stock Keeping Unique. Every product has a different SKU.
- Status – Status 0 indicates the product is out of stock and 1 indicates the product is available for purchase.
- Quantity – Total number of quantity available for particular SKU and source.
Follow the below steps to export inventory in Magento 2.
Steps to Export Inventory for All Sources in Magento 2

- Login to Magento 2 admin panel
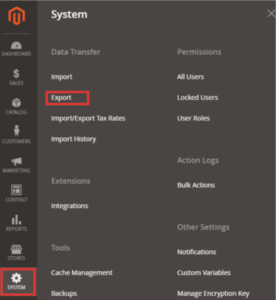
- Navigate to System > Data Transfer > Export
- In Entity Type, select Stock Sources

All the products having SKUs will be added to the CSV file. - Export File Format will remain CSV
- Click Continue
Steps to Export Inventory for a Specific Source in Magento 2
Follow the below steps to export inventory for a specific source in Magento 2.
- Navigate to System > Data Transfer > Export
- In Entity Type, select Stock Sources
All the products having SKUs will be added to the CSV file.
- Export File Format will remain CSV
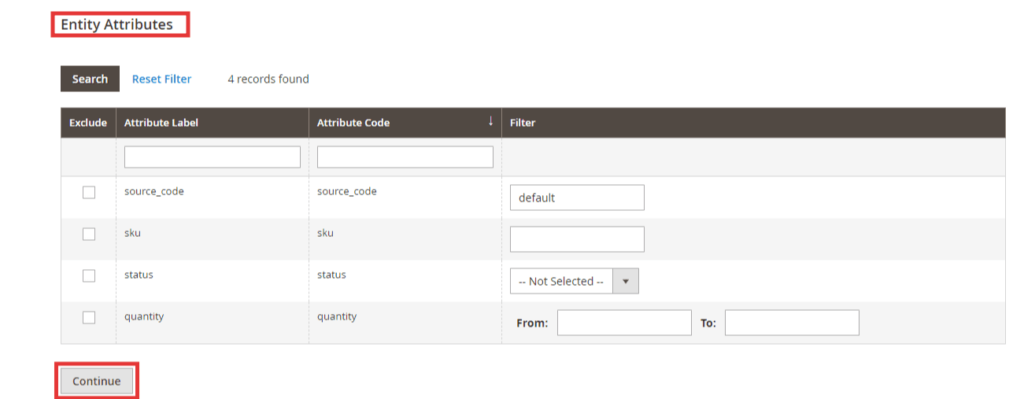
- Leverage Entity Attribute, to filter the exported products for a specific source.
Enter the source_code for exporting CSV file for a specific source. - Click Continue
Steps to Import Inventory in Magento 2
Follow the below steps to import inventory in Magento 2.
- Login to Magento 2 admin panel.
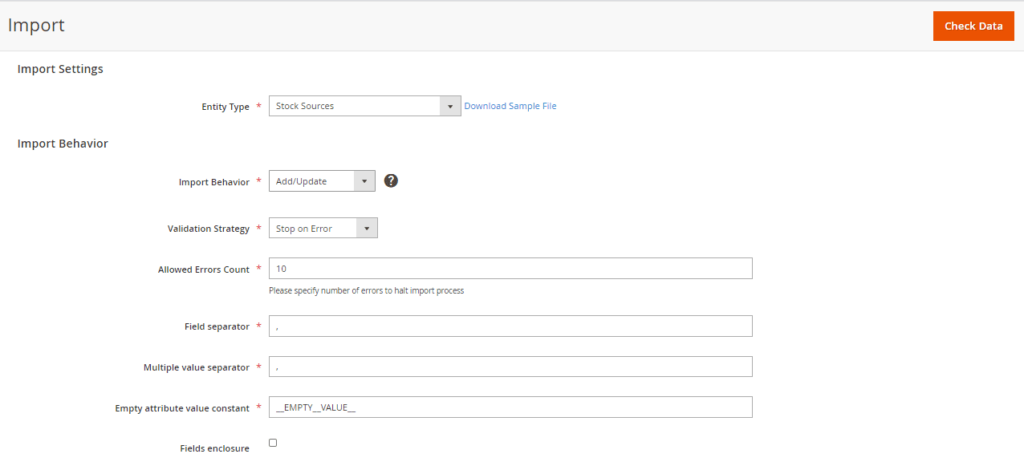
- Navigate to Stores > Data Transfer > Import
- In Entity Type, select Stock Sources
- Select Import Behaviour based on your business requirement

- Upload CSV file in Select File to Import option

- Click Check Data
That’s it.
If you need help regarding this blog, feel free to ask in the Comments section below.
I would be happy to answer your queries.
Do consider sharing this post with Magento Community via social media.
Thank you.
Sanjay Jethva
Sanjay is the co-founder and CTO of Meetanshi with hands-on expertise with Magento since 2011. He specializes in complex development, integrations, extensions, and customizations. Sanjay is one the top 50 contributor to the Magento community and is recognized by Adobe.
His passion for Magento 2 and Shopify solutions has made him a trusted source for businesses seeking to optimize their online stores. He loves sharing technical solutions related to Magento 2 & Shopify.


Prev
Solved: Allowed Memory Size of Bytes Exhausted in Magento 2
How to Remove Field in Billing Address From Checkout in Magento 2
Next