How to Clear Magento 2 Cache
Cache is a particular area of your hosting server. It helps to increase the page load speed by storing the web pages through browsers. Also, it reduces resource requirements in the situation of heavy traffic.
The basic advantage of using cache is faster performance. If you are unsure of why the changes made on the website don’t reflect, the very first step you should try is to refresh the cache to reflect those changes in the frontend.
Everyone wants the fastest way to delete cache in Magento 2! Here are the three methods for Magento 2 Clear Cache which might prove useful to you 🙂
Read about:
- Clear Magento 2 cache via admin panel
- Clear Magento 2 cache via command line
- Clear Magento 2 cache programmatically
- Full Page Cache
- Difference between Magento 2 cache clean and cache flush
- Method to enable cache types
Method 1: Clear Magento 2 Cache via Admin Panel
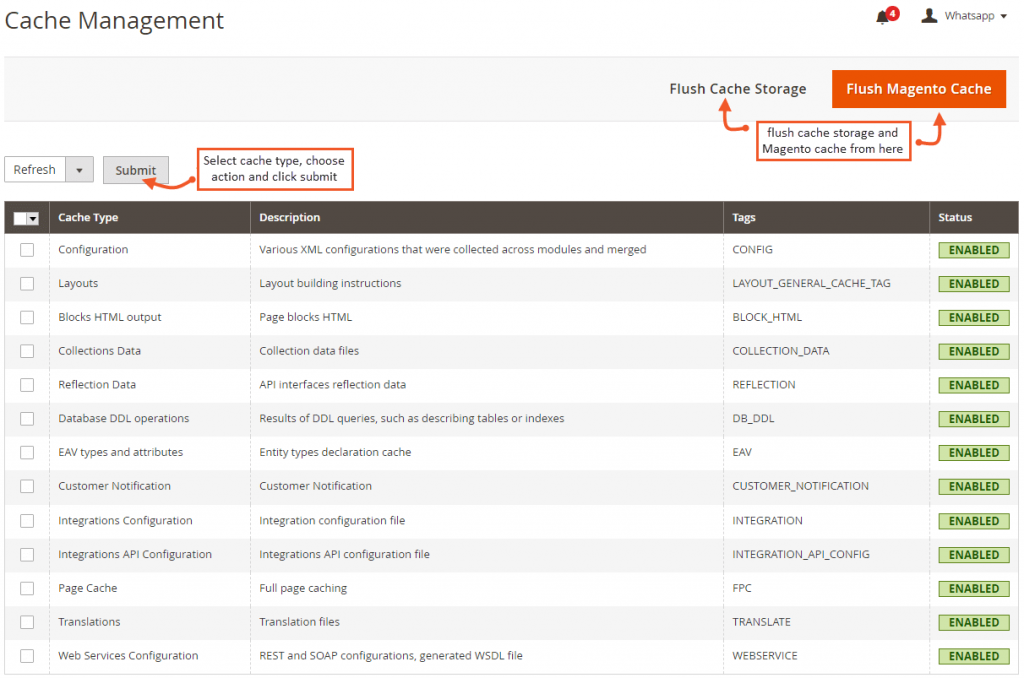
- Navigate to Admin Panel > System > Cache Management
- Define the cache types that is to be refreshed
- Select the Cache Type blocks that are assigned Invalidated status. You may select “All” if you don’t know what to refresh.
- Set the “Refresh” action and click on the “Submit” button.
- Additionally, you may use “Flush Magento Cache” or “Flush Cache Storage” buttons.
- Flush Magento Cache: Refresh the cache in the backend and inner cache with Magento tag.
- Flush Cache Storage: Refresh cache of all Magento stores sharing one cache storage, though based on different servers.
Method 2: Magento 2 Clear Cache via Command Line
You can delete cache manually using the below commands from Command Line:
- Enable the cache:
php bin/magento cache:enable
- Disable the cache:
php bin/magento cache:disable
- Flush the cache:
php bin/magento cache:flush
- Clean the cache in the website:
php bin/magento cache:clean
To clean specific cache types, you need to specify the types, e.g.: config, layout, block_html, collections, reflection, db_ddl, eav, etc.
Method 3: Magento 2 Clear Cache Programmatically
Store admin may have the requirements to clean and flush cache programmatically in Magento 2. It is advisable to implement it in order to offer a speedy store to store users.
|
1 2 3 4 5 6 7 8 9 10 11 12 13 14 15 16 17 18 19 20 21 22 23 24 25 |
<?php use Magento\Framework\App\PageCache\Version; use Magento\Framework\App\Cache\TypeListInterface; use Magento\Framework\App\Cache\Frontend\Pool; protected $cacheTypeList; protected $cacheFrontendPool; public function __construct(TypeListInterface $cacheTypeList, Pool $cacheFrontendPool){ $this->cacheTypeList = $cacheTypeList; $this->cacheFrontendPool = $cacheFrontendPool; } public function cacheFunction(Version $subject) { $types = array('config','layout','block_html','collections','reflection','db_ddl','eav','config_integration','config_integration_api','full_page','translate','config_webservice'); foreach ($types as $type) { $this->cacheTypeList->cleanType($type); } foreach ($this->cacheFrontendPool as $cacheFrontend) { $cacheFrontend->getBackend()->clean(); } } |
Full Page Cache
Enable Full Page Cache to enhance the performance of your website and increase the page load speed:
- Navigate to Stores > Configuration > Advanced > System > Full Page Cache
- Choose either Built-In Cache or Varnish Cache
Note: Varnish cache is 4 to 9 times faster than Built-In Cache
You can implement the Full Page Cache Warmer for Magento 2. The module allows for speeding up your online store due to timely cache warming whenever needed. Also, you can exclude separate pages from warming and enable the auto-update cache after changes.
Know the difference between Magento 2 cache clean and cache flush:
Magento 2 Clean Cache: Deletes all enabled Cache type from Magento 2 due to which the disabled cache types are not cleaned.
Magento 2 Flush Cache: Cleans all the cache types collected in storage. It may affect other processing applications that run the same cache storage.
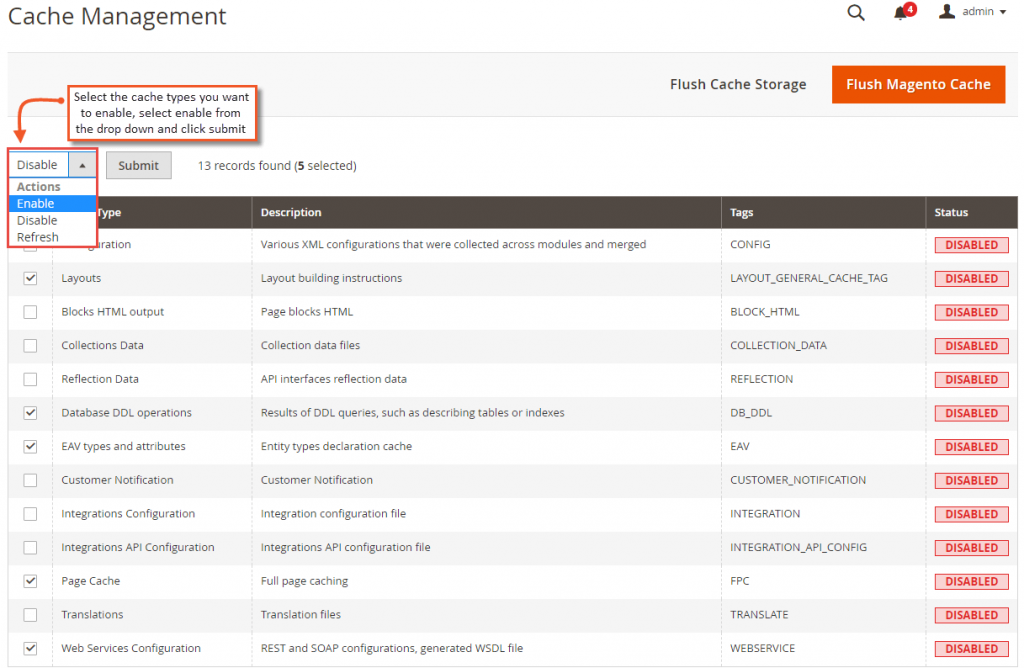
How to enable Cache Types?
For clearing specific cache types which have not been assigned Invalidated status, go to Cache Management and configure the following settings:
- Select the cache types you want to enable.
- Set Enable from the upper left drop-down menu.
- Click “Submit” button.
That’s all about Clearing Magento 2 Cache! I have tried to elaborate basic Magento 2 cache concepts, apply methods to cache your Magento 2 store and improve store performance.
Hopefully, the article is useful to you. Feel free to post your doubts and suggestions in the comments section. Both are much appreciated!
Flash 5 stars to appreciate my article if you really liked it.
Happy Caching 🙂
Sanjay Jethva
Sanjay is the co-founder and CTO of Meetanshi with hands-on expertise with Magento since 2011. He specializes in complex development, integrations, extensions, and customizations. Sanjay is one the top 50 contributor to the Magento community and is recognized by Adobe.
His passion for Magento 2 and Shopify solutions has made him a trusted source for businesses seeking to optimize their online stores. He loves sharing technical solutions related to Magento 2 & Shopify.


2 Comments
Yes dear you are right but if we want to delete magento cache file in cantos server so which file location we want delete magento cache file flush
Hello Ritesh,
It resides in [magento_install_dir]/var/cache.
Thank You